

Cat trees come in all kinds of amazing designs, shapes and sizes nowadays. If you’re a DIYer, however, you might like to try your hand at making your own.
Cat trees are a must-have item for many kitty aficionados. They provide entertainment and exercise, and are a great way to enrich the environment for indoor kitties. There are a growing number of cat tree styles to choose from, but if you’re looking for something specific, or just like to build things, you can also make your own.
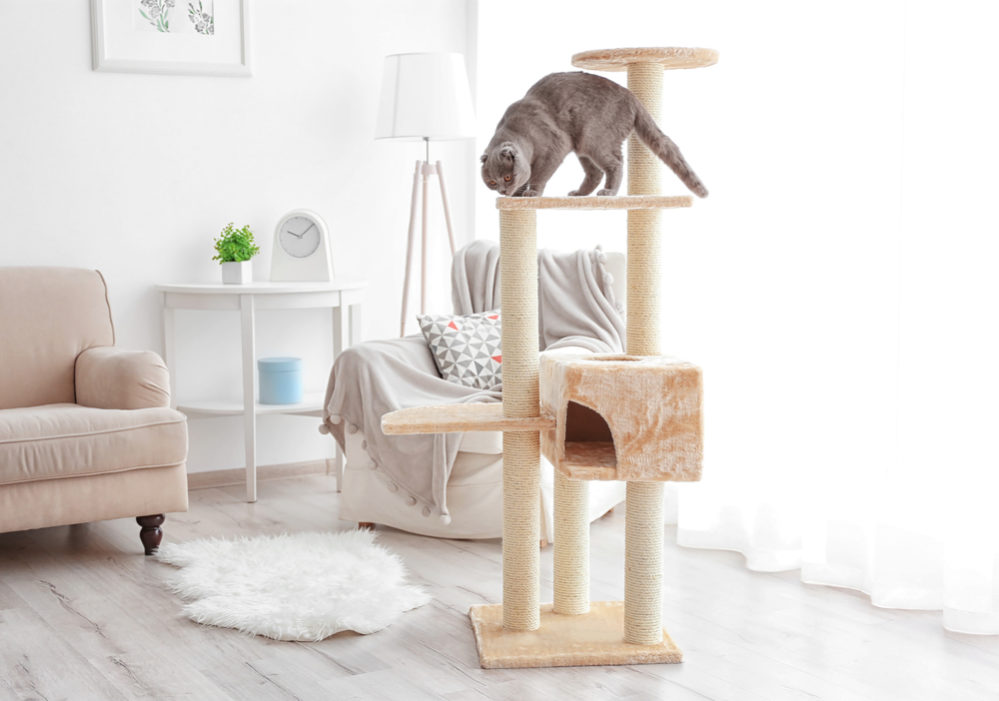
Start by measuring the area in which you have decided to place your cat tree. An ideal spot will have an outside window view and allow your cat some natural sunlight. The tree itself should be tall enough to give your cat plenty of scope for climbing, scratching and perching.
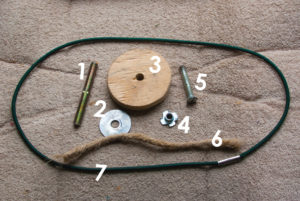 A few of the materials and parts you’ll need: 1. a double screw to go between the two poles with the perch board between them 2. one of three washers needed to attach the other perch boards to the poles 3. one of eight hardwood discs for placing inside the pole ends 4. a T fastener 5. and a T fastener screw 6. A piece of sisal cord 7. Elasticized bands the author used to fasten padded mats to her perches.
- One 38” x 15” x 1” board for the base. Round the edges. Drill a center hole, as well as holes on each side of the base, 12” from the center hole. Countersink three T fasteners into the bottom of the board.
- Four 17” x 11” x 1/2” boards to be made into perches. Drill center holes in three of these boards for the top perches. In the fourth board, drill a hole 6” from the 11” side toward the middle; this will be for the middle perch of the tallest double pole (see photo).
- Eight square feet of remnant carpeting. This can be used to cover the boards, using glue. Staple the edges underneath the boards. Leave the drilled holes open. You can use alternatives to carpeting; I chose padded dish draining mats to wrap around the perch boards; they’re held in place with three large stretch bands that crisscross around the poles to keep the covers snuggly in place. This design makes for easy washing, and also holds wand toys.
- One 9’ (long) empty sturdy cardboard carpeting roll. Use it to create your poles. Cut a 36” long middle pole for the tree, and three more poles at 22” long each. We got two empty carpeting rolls — these were free for the asking at a flooring store. I have an extra 22” pole that is not attached to the cat tree — it can be re-wrapped and used to replace another pole when needed. For now, I have place it under the bottom perch board for extra support (see photo).
- Eight 1/2” thick hardwood circles. Cut these to fit inside each end of the poles. Drill center holes in all of these to fit eight T fasteners, and insert the fasteners. Glue and staple the circles inside the top and bottom holes of all poles.
- 500 feet of all-natural sisal rope. This is glued around all four poles, using a hot glue gun and a large package of glue stick. Don’t go over the circular ends. This takes some time and patience. You can also use carpeting if you wish, but sisal rope is the most durable. It has withstood my polydactyl cat’s scratching and climbing for many years.
- Three 3” screws. Insert these screws up through the T fasteners in the bottom of the base board, and up through the T fasteners in the bottom circles of the poles. Tighten the poles to the base board, placing the 36” pole in the middle.
- One 4” long double threaded screw with stopper in the middle. Insert in the top circle of the 22” pole you have chosen to use for the bottom of the tallest double pole. Now place the perch board with the off center hole over that same screw. Place the bottom circle hole of the top 22” pole on top of the perch (to make your tallest 44” pole, not counting the widths of the perches).
- Three straight bolts and three fender washers. Put these into the three other perch boards with center holes, and into the top circles of the three pole tops.
As with any new item that comes into a cat home you may have to encourage your cat to use this by either putting catnip on it or using wand toys to get him climbing and playing around the tree. Before long, it’ll be his favorite spot!
[Caption for parts photo]
A few of the materials and parts you’ll need (from left to right): a double screw to go between the two poles with the perch board between them; one of three washers needed to attach the other perch boards to the poles; one of eight hardwood discs for placing inside the pole ends; a T fastener; and a T fastener screw. At the bottom is a piece of sisal cord, and all are surrounded by one of the elasticized bands the author used to fasten padded mats to her perches.

No Comment